Most developers are not also designers, but we commonly have to take a static design we get and figure out how to make it interactive. Recently, I received a set of Illustrator files that depicted circuit diagrams that a user needed to interact with to say whether they thought the circuit would have enough power to light one or more light bulbs.
I could have tried to simply create graphics with every possible state of all the bulbs, but I decided that would be difficult to maintain. I could also have tried to overlay each bulb with a div that contained the various states for that bulb, but I thought that would be difficult to make responsive. Instead, I decided to use data binding in AngularJS to allow users to interact directly with the bulbs inside the SVG.
What I found is there are a lot of resources on SVG in various places on the internet, but none pulled together all the pieces needed to accomplish this task. So I figure it’s up to me. Here are the things I needed to find out to make this work:
- How to get Illustrator to create a usable SVG file
- Editing the SVG code
- A simple angular project with interactive SVG.
In this post, we'll get up and running with a simple SVG example. In the next post, we'll look at the different ways you can use SVG in HTML and the plusses and minuses of each.
How to get Illustrator to create a usable SVG file
Let’s imagine that the illustrator file I got from the designer looks something like this:
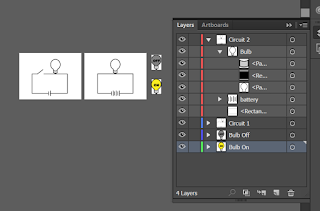
Because I know where I’m headed with this, the file is clean, tidy, and organized. More than likely you will have to clean up paths so they don’t have a lot of unnecessary points that will bloat your file size. You may also need to create groups and layers.
Tips: When you export files from Illustrator, each art board will be a different file. The groups and layers control how the objects are organized within that. It is possible to have objects that are in different layers that are on the same art board, and vice versa, so you may need to reorganize the files to fix that.
Avoid using underscores in layer and group names, because AI will encode them in an odd way. If you want an underscore in an object ID, use a space and Illustrator will replace it with an underscore.
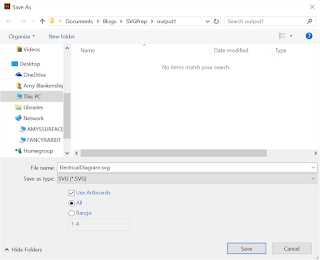
At this point, you might be tempted to follow the Illustrator docs and go to File>Export>SVG. You can try, but the sad truth is there is no SVG option under File>Export in Illustrator CC. Instead, you can go to File>Save As. You’ll want to select “Use ArtBoards.”
Once you click “Save”, it doesn’t save—Hey-ho, counterintuitive dialog! Instead, it will take you to another dialog, where you can select your SVG output options. The defaults are pretty good. Note here that we’ve selected “Style Attributes” for our CSS Properties. What that means is that things like stroke and fill color will be turned into CSS styles in a style tag at the top of the document. For more on the other options, see Demystifying Adobe Illustrator's Advanced Options for SVG Work.
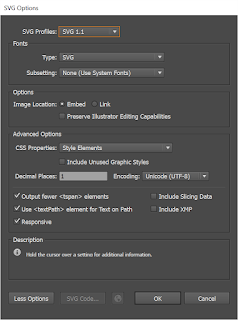
Once you click “OK,” you’ll get an SVG file for every artboard. If you open one of these in any XML or text editor, you’ll get something (output1) like this:
<?xml version="1.0" encoding="utf-8"?>
<!-- Generator: Adobe Illustrator 18.1.0, SVG Export Plug-In . SVG Version: 6.00 Build 0)  -->
<svg version="1.1" xmlns="http://www.w3.org/2000/svg" xmlns:xlink="http://www.w3.org/1999/xlink" x="0px" y="0px"
  viewBox="0 0 400 300" style="enable-background:new 0 0 400 300;" xml:space="preserve">
<style type="text/css">
 .st0{fill:#FCEE21;stroke:#000000;stroke-width:3;stroke-miterlimit:10;}
 .st1{stroke:#000000;stroke-width:3;stroke-miterlimit:10;}
 .st2{fill:#CCCCCC;stroke:#000000;stroke-width:2;stroke-miterlimit:10;}
 .st3{fill:#808080;stroke:#000000;stroke-width:3;stroke-miterlimit:10;}
 .st4{fill:#FFFFFF;stroke:#000000;stroke-width:3;stroke-miterlimit:10;}
 .st5{fill:#FFFFFF;}
 .st6{fill:none;stroke:#000000;stroke-width:3;stroke-miterlimit:10;}
</style>
<g id="Bulb_On">
</g>
<g id="Bulb_Off">
</g>
<g id="Circuit_1">
 <polyline class="st4" points="158.3,137.1 311.3,137.1 311.3,261.2 83.3,261.2 83.3,137.1 117.4,137.1 154.4,108.1  "/>
 <g id="battery">
  <rect x="188.5" y="258" class="st5" width="15.1" height="6"/>
  <line class="st6" x1="190.5" y1="250" x2="190.5" y2="274"/>
  <line class="st6" x1="201.5" y1="244" x2="201.5" y2="278"/>
 </g>
 <g id="Bulb_1_">
  <path class="st4" d="M264.9,76.3c0-18.6-13.9-33.6-31-33.6c-17.1,0-30.8,15.1-30.8,33.6c0,13.7,7.5,25.4,18.5,30.7v21.6h25v-21.6
   C257.5,101.7,264.9,89.9,264.9,76.3z"/>
  <rect x="230.5" y="131.3" class="st1" width="6.8" height="5.6"/>
  <path class="st2" d="M246.6,129.6c-2.6,1-6.6,2.3-11.7,2.4c-6.1,0.2-10.9-1.3-13.7-2.4c0-5.9,0-11.8,0-17.7
   c2.1,1.1,6.6,3.3,12.8,3.3c6.1,0,10.5-2.1,12.6-3.3C246.6,117.8,246.6,123.7,246.6,129.6z"/>
 </g>
</g>
<g id="Circuit_2">
</g>
</svg>
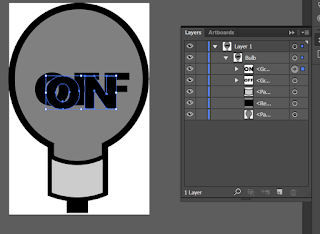
I don't know about you, but I'd like some more informative style names. So, back in the Illustrator file, we'll create and apply some named styles, like so:
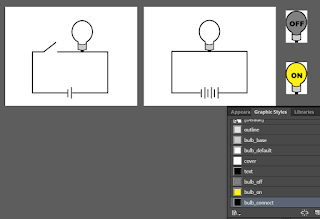
Once you do that, your SVG should look more like this:
-
<?xml version="1.0" encoding="utf-8"?>
<!-- Generator: Adobe Illustrator 18.1.0, SVG Export Plug-In . SVG Version: 6.00 Build 0)  -->
<svg version="1.1" xmlns="http://www.w3.org/2000/svg" xmlns:xlink="http://www.w3.org/1999/xlink" x="0px" y="0px"
  viewBox="0 0 400 300" style="enable-background:new 0 0 400 300;" xml:space="preserve">
<style type="text/css">
 .outline{fill:none;stroke:#000000;stroke-width:3;stroke-miterlimit:10;}
 .bulb_base{fill:#CCCCCC;stroke:#000000;stroke-width:2;stroke-miterlimit:10;}
 .bulb_default{fill:#FFFFFF;stroke:#000000;stroke-width:3;stroke-miterlimit:10;}
 .cover{fill:#FFFFFF;}
 .bulb_connect{stroke:#000000;stroke-width:3;stroke-miterlimit:10;}
 .st0{fill:#FCEE21;stroke:#000000;stroke-width:3;stroke-miterlimit:10;}
 .st1{fill:#808080;stroke:#000000;stroke-width:3;stroke-miterlimit:10;}
</style>
<g id="Bulb_On">
</g>
<g id="Bulb_Off">
</g>
<g id="Circuit_1">
 <polyline class="outline" points="158.3,137.1 311.3,137.1 311.3,261.2 83.3,261.2 83.3,137.1 117.4,137.1 154.4,108.1  "/>
 <g id="battery">
  <rect x="188.5" y="258" class="cover" width="15.1" height="6"/>
  <line class="outline" x1="190.5" y1="250" x2="190.5" y2="274"/>
  <line class="outline" x1="201.5" y1="244" x2="201.5" y2="278"/>
 </g>
 <g id="Bulb_1_">
  <path class="bulb_default" d="M264.9,76.3c0-18.6-13.9-33.6-31-33.6c-17.1,0-30.8,15.1-30.8,33.6c0,13.7,7.5,25.4,18.5,30.7v21.6
   h25v-21.6C257.5,101.7,264.9,89.9,264.9,76.3z"/>
  <rect x="230.5" y="131.3" class="bulb_connect" width="6.8" height="5.6"/>
  <path class="bulb_base" d="M246.6,129.6c-2.6,1-6.6,2.3-11.7,2.4c-6.1,0.2-10.9-1.3-13.7-2.4c0-5.9,0-11.8,0-17.7
   c2.1,1.1,6.6,3.3,12.8,3.3c6.1,0,10.5-2.1,12.6-3.3C246.6,117.8,246.6,123.7,246.6,129.6z"/>
 </g>
</g>
<g id="Circuit_2">
</g>
</svg>
Hand-editing the files
This file is in much better shape. It has some extra things you'll need to remove, but all of that is obvious. First, you need to remove the comment. After that, you can remove the styles that are in the form .stx (where x is some number). Those are the styles that are not used by the graphics that were on the artboard that became this particular document. Then you need to remove the empty "g" tags that, again, represent the other art boards.
We're only going to use the two circuit diagrams in Angular, but we need to combine the two bulbs into one "g" tag and replace the existing bulb in each circuit diagram with it. One of the goals is to have a "g" where all the graphics are relative to the zero point so we can just translate it to where the empty bulb is in the circuit diagram. This is because the syntax of the path objects doesn't lend itself to easily being moved around in the SVG file, so it's easier to create the objects at the zero point and move the entire group they are in. Unfortunately, we can't just use the bulbs output as SVG because they didn't respect the artboard bounds used in the document. So we're going to go back to Illustrator and create a new file with all the needed shapes by copying and pasting pieces from our existing file.
If you simply copy all the contents of this document to your clipboard, your clipboard will contain something like this:
<!-- Generator: Adobe Illustrator 18.1.0, SVG Export Plug-In  -->
<svg version="1.1"
  xmlns="http://www.w3.org/2000/svg" xmlns:xlink="http://www.w3.org/1999/xlink" xmlns:a="http://ns.adobe.com/AdobeSVGViewerExtensions/3.0/"
  x="0px" y="0px" width="65px" height="97.2px" viewBox="0 0 65 97.2" style="overflow:scroll;enable-background:new 0 0 65 97.2;"
  xml:space="preserve">
<style type="text/css">
 .bulb_base{fill:#CCCCCC;stroke:#000000;stroke-width:2;stroke-miterlimit:10;}
 .bulb_connect{stroke:#000000;stroke-width:3;stroke-miterlimit:10;}
 .bulb_off{fill:#808080;stroke:#000000;stroke-width:3;stroke-miterlimit:10;}
</style>
<defs>
</defs>
<g id="Bulb_1_">
 <path class="bulb_off" d="M63.5,35.1c0-18.6-13.6-33.6-30.8-33.6C15.6,1.5,1.5,16.6,1.5,35.1c0,13.7,7.1,25.4,18.1,30.7v21.6h25
  V65.8C55.6,60.5,63.5,48.8,63.5,35.1z"/>
 <rect x="28.4" y="90.1" class="bulb_connect" width="6.8" height="5.6"/>
 <path class="bulb_base" d="M44.6,88.4c-2.6,1-6.6,2.3-11.7,2.4c-6.1,0.2-10.9-1.3-13.7-2.4c0-5.9,0-11.8,0-17.7
  C21.2,71.9,25.8,74,32,74c6.1,0,10.5-2.1,12.6-3.3C44.6,76.6,44.6,82.5,44.6,88.4z"/>
 <g id="Off_text_1_">
  <path class="text" d="M12.3,39.9c0-9.9,15.1-10.5,15.6-0.6c0.2,4.9-2.7,8.3-7.6,8.3C15.5,47.6,12.3,44.6,12.3,39.9z M17,39.9
   c0,2.1,0.7,4.2,3.1,4.3c2.6,0,3.2-2.4,3.1-4.5C23.2,34.4,17,34.6,17,39.9z"/>
  <path class="text" d="M30.4,32.3h11.5v3.2h-6.8v2.6h5.8v3h-5.8v6.1h-4.7V32.3z"/>
  <path class="text" d="M44.4,32.3h11.5v3.2h-6.8v2.6h5.8v3h-5.8v6.1h-4.7V32.3z"/>
 </g>
 <g id="On_text_1_">
  <path class="text" d="M17.3,41.4c0-9.9,15.1-10.5,15.6-0.6c0.2,4.9-2.7,8.3-7.6,8.3C20.5,49.2,17.3,46.2,17.3,41.4z M22,41.5
   c0,2.1,0.7,4.2,3.1,4.3c2.6,0,3.2-2.4,3.1-4.5C28.2,36,22,36.2,22,41.5z"/>
  <path class="text" d="M35.4,33.9h4.3l5.7,8.3v-8.3h4.4v15h-4.4l-5.6-8.3V49h-4.4V33.9z"/>
 </g>
</g>
</svg>
Note that if you copy a selection that contains actual text, you will not get SVG on your clipboard. Instead, you'll just get the text.
The part we want is the "g" with the id of "Bulb_1." I'm going to clean up and rename some things to remove the unnecessary numbers Illustrator is putting at the end of many of our g id's. I'll also change the path that has a class of "bulb_off" to have no class, but instead to have an id of "bulb_bg." We'll be changing the fill of this path and the visibility of the "off" and "on" text based on whether the bulb is on or off. We'll wind up with this:
<g id="Bulb">
 <path id="bulb_bg" d="M63.5,35.1c0-18.6-13.6-33.6-30.8-33.6C15.6,1.5,1.5,16.6,1.5,35.1c0,13.7,7.1,25.4,18.1,30.7v21.6h25
  V65.8C55.6,60.5,63.5,48.8,63.5,35.1z"/>
 <rect x="28.4" y="90.1" class="bulb_connect" width="6.8" height="5.6"/>
 <path class="bulb_base" d="M44.6,88.4c-2.6,1-6.6,2.3-11.7,2.4c-6.1,0.2-10.9-1.3-13.7-2.4c0-5.9,0-11.8,0-17.7
  C21.2,71.9,25.8,74,32,74c6.1,0,10.5-2.1,12.6-3.3C44.6,76.6,44.6,82.5,44.6,88.4z"/>
 <g id="Off_text">
  <path class="text" d="M12.3,39.9c0-9.9,15.1-10.5,15.6-0.6c0.2,4.9-2.7,8.3-7.6,8.3C15.5,47.6,12.3,44.6,12.3,39.9z M17,39.9
   c0,2.1,0.7,4.2,3.1,4.3c2.6,0,3.2-2.4,3.1-4.5C23.2,34.4,17,34.6,17,39.9z"/>
  <path class="text" d="M30.4,32.3h11.5v3.2h-6.8v2.6h5.8v3h-5.8v6.1h-4.7V32.3z"/>
  <path class="text" d="M44.4,32.3h11.5v3.2h-6.8v2.6h5.8v3h-5.8v6.1h-4.7V32.3z"/>
 </g>
 <g id="On_text>
  <path class="text" d="M17.3,41.4c0-9.9,15.1-10.5,15.6-0.6c0.2,4.9-2.7,8.3-7.6,8.3C20.5,49.2,17.3,46.2,17.3,41.4z M22,41.5
   c0,2.1,0.7,4.2,3.1,4.3c2.6,0,3.2-2.4,3.1-4.5C28.2,36,22,36.2,22,41.5z"/>
  <path class="text" d="M35.4,33.9h4.3l5.7,8.3v-8.3h4.4v15h-4.4l-5.6-8.3V49h-4.4V33.9z"/>
 </g>
</g>
Next, we'll go back into one of our circuit svg files and replace the plain bulb with this bulb, translated to where the original bulb was. I usually look in illustrator at the properties or transform panel in the original file to see where it was.
The edited svg looks like this:
<?xml version="1.0" encoding="utf-8"?>
<svg version="1.1" xmlns="http://www.w3.org/2000/svg" xmlns:xlink="http://www.w3.org/1999/xlink" x="0px" y="0px"
  viewBox="0 0 400 300" style="enable-background:new 0 0 400 300;" xml:space="preserve">
<style type="text/css">
 .outline{fill:none;stroke:#000000;stroke-width:3;stroke-miterlimit:10;}
 .bulb_base{fill:#CCCCCC;stroke:#000000;stroke-width:2;stroke-miterlimit:10;}
 .bulb_default{fill:#FFFFFF;stroke:#000000;stroke-width:3;stroke-miterlimit:10;}
 .cover{fill:#FFFFFF;}
 .bulb_connect{stroke:#000000;stroke-width:3;stroke-miterlimit:10;}
</style>
<g id="Circuit_1">
 <polyline class="outline" points="158.3,137.1 311.3,137.1 311.3,261.2 83.3,261.2 83.3,137.1 117.4,137.1 154.4,108.1  "/>
 <g id="battery">
  <rect x="188.5" y="258" class="cover" width="15.1" height="6"/>
  <line class="outline" x1="190.5" y1="250" x2="190.5" y2="274"/>
  <line class="outline" x1="201.5" y1="244" x2="201.5" y2="278"/>
 </g>
 <g id="Bulb" transform="translate(201, 41)">
  <path id="bulb_bg" d="M63.5,35.1c0-18.6-13.6-33.6-30.8-33.6C15.6,1.5,1.5,16.6,1.5,35.1c0,13.7,7.1,25.4,18.1,30.7v21.6h25
  V65.8C55.6,60.5,63.5,48.8,63.5,35.1z"/>
  <rect x="28.4" y="90.1" class="bulb_connect" width="6.8" height="5.6"/>
  <path class="bulb_base" d="M44.6,88.4c-2.6,1-6.6,2.3-11.7,2.4c-6.1,0.2-10.9-1.3-13.7-2.4c0-5.9,0-11.8,0-17.7
  C21.2,71.9,25.8,74,32,74c6.1,0,10.5-2.1,12.6-3.3C44.6,76.6,44.6,82.5,44.6,88.4z"/>
  <g id="Off_text">
   <path class="text" d="M12.3,39.9c0-9.9,15.1-10.5,15.6-0.6c0.2,4.9-2.7,8.3-7.6,8.3C15.5,47.6,12.3,44.6,12.3,39.9z M17,39.9
   c0,2.1,0.7,4.2,3.1,4.3c2.6,0,3.2-2.4,3.1-4.5C23.2,34.4,17,34.6,17,39.9z"/>
   <path class="text" d="M30.4,32.3h11.5v3.2h-6.8v2.6h5.8v3h-5.8v6.1h-4.7V32.3z"/>
   <path class="text" d="M44.4,32.3h11.5v3.2h-6.8v2.6h5.8v3h-5.8v6.1h-4.7V32.3z"/>
  </g>
  <g id="On_text>
   <path class="text" d="M17.3,41.4c0-9.9,15.1-10.5,15.6-0.6c0.2,4.9-2.7,8.3-7.6,8.3C20.5,49.2,17.3,46.2,17.3,41.4z M22,41.5
   c0,2.1,0.7,4.2,3.1,4.3c2.6,0,3.2-2.4,3.1-4.5C28.2,36,22,36.2,22,41.5z"/>
   <path class="text" d="M35.4,33.9h4.3l5.7,8.3v-8.3h4.4v15h-4.4l-5.6-8.3V49h-4.4V33.9z"/>
  </g>
 </g>
</g>
</svg>
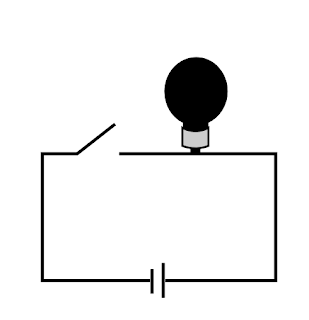
If you preview the SVG in a browser, it looks like this, because we haven't defined the on and off classes or applied them:
We'll add the styles for the bulb based on the named styles in our exported svg with the on and off bulbs in them. I usually hard-code the class for each state just to make sure they look the way I expect. This is the code for the "on" state:
<?xml version="1.0" encoding="utf-8"?>
<svg version="1.1" xmlns="http://www.w3.org/2000/svg" xmlns:xlink="http://www.w3.org/1999/xlink" x="0px" y="0px"
  viewBox="0 0 400 300" style="enable-background:new 0 0 400 300;" xml:space="preserve">
<style type="text/css">
 .outline{fill:none;stroke:#000000;stroke-width:3;stroke-miterlimit:10;}
 .bulb_base{fill:#CCCCCC;stroke:#000000;stroke-width:2;stroke-miterlimit:10;}
 #bulb_bg{fill:#FFFFFF;stroke:#000000;stroke-width:3;stroke-miterlimit:10;}
 #On_text, #Off_text {visibility:hidden}
 .cover{fill:#FFFFFF;}
 .bulb_connect{stroke:#000000;stroke-width:3;stroke-miterlimit:10;}
 .off #bulb_bg {fill:#808080;stroke:#000000;stroke-width:3;stroke-miterlimit:10;}
 .on #On_text, .off #Off_text {visibility:visible}
 .on #bulb_bg {fill:#FCEE21;stroke:#000000;stroke-width:3;stroke-miterlimit:10;}
</style>
<g id="Circuit_1">
 <polyline class="outline" points="158.3,137.1 311.3,137.1 311.3,261.2 83.3,261.2 83.3,137.1 117.4,137.1 154.4,108.1  "/>
 <g id="battery">
  <rect x="188.5" y="258" class="cover" width="15.1" height="6"/>
  <line class="outline" x1="190.5" y1="250" x2="190.5" y2="274"/>
  <line class="outline" x1="201.5" y1="244" x2="201.5" y2="278"/>
 </g>
 <g id="Bulb" class="on" transform="translate(201, 41)">
  <path id="bulb_bg" d="M63.5,35.1c0-18.6-13.6-33.6-30.8-33.6C15.6,1.5,1.5,16.6,1.5,35.1c0,13.7,7.1,25.4,18.1,30.7v21.6h25
  V65.8C55.6,60.5,63.5,48.8,63.5,35.1z" />
  <rect x="28.4" y="90.1" class="bulb_connect" width="6.8" height="5.6"/>
  <path class="bulb_base" d="M44.6,88.4c-2.6,1-6.6,2.3-11.7,2.4c-6.1,0.2-10.9-1.3-13.7-2.4c0-5.9,0-11.8,0-17.7
  C21.2,71.9,25.8,74,32,74c6.1,0,10.5-2.1,12.6-3.3C44.6,76.6,44.6,82.5,44.6,88.4z"/>
  <g id="Off_text">
   <path class="text" d="M12.3,39.9c0-9.9,15.1-10.5,15.6-0.6c0.2,4.9-2.7,8.3-7.6,8.3C15.5,47.6,12.3,44.6,12.3,39.9z M17,39.9
   c0,2.1,0.7,4.2,3.1,4.3c2.6,0,3.2-2.4,3.1-4.5C23.2,34.4,17,34.6,17,39.9z"/>
   <path class="text" d="M30.4,32.3h11.5v3.2h-6.8v2.6h5.8v3h-5.8v6.1h-4.7V32.3z"/>
   <path class="text" d="M44.4,32.3h11.5v3.2h-6.8v2.6h5.8v3h-5.8v6.1h-4.7V32.3z"/>
  </g>
  <g id="On_text">
   <path class="text" d="M17.3,41.4c0-9.9,15.1-10.5,15.6-0.6c0.2,4.9-2.7,8.3-7.6,8.3C20.5,49.2,17.3,46.2,17.3,41.4z M22,41.5
   c0,2.1,0.7,4.2,3.1,4.3c2.6,0,3.2-2.4,3.1-4.5C28.2,36,22,36.2,22,41.5z"/>
   <path class="text" d="M35.4,33.9h4.3l5.7,8.3v-8.3h4.4v15h-4.4l-5.6-8.3V49h-4.4V33.9z"/>
  </g>
 </g>
</g>
</svg>
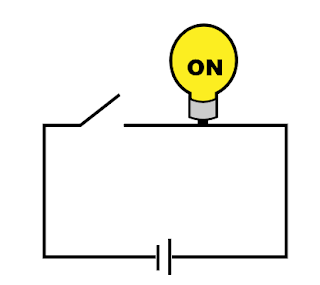
It looks like this in the browser:
Now that we know all our styles look right, we're going to edit the Bulb group to be interactive:
<g id="Bulb" data-ng-class="bulb.state" data-ng-click="toggleBulbState()" transform="translate(201, 41)">
...
</g>


0 comments:
Post a Comment