When I find a workflow I like, I sometimes assume that everyone has already discovered that workflow, and I'm late to the party. One of the nice things about participating in user forums is that sometimes that helps me realize that a favorite workflow isn't known to everyone. This is great, because then I have something to blog about!
Today, I want to talk about what is probably one of my all-time best productivity tricks in Flash. In a few minutes, I can:
- Import a series of pngs, jpgs, or whatever into my Flash movie
- Choose for each image to be wrapped in a symbol or not
- Have the symbols and images nicely organized into folders in the library, without any extra effort!
Step 1: Browse the folder in Bridge
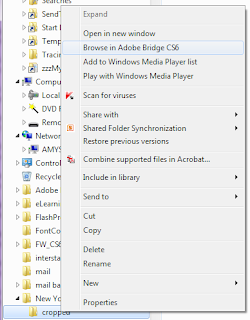
First, I right-click on the folder of images and select "Browse in Adobe Bridge"
Once it opens, I select the images I want to use. For this post, I just selected everything in the directory, but Bridge has excellent features for finding just the images I want (that could be a blog post in itself). You can drag them around in Bridge to change the order, if you need to.
Step 2: Load the files into PhotoShop Layers
In the Bridge "Tools" menu, I select PhotoShop>Load Files into PhotoShop Layers.
This launches PhotoShop and does all the work to put the files into PhotoShop layers, in the order they were in in Bridge. Once that has finished running, save the result as a .psd.
Step 3: Create a Symbol in Flash to Import into
Whenever I have to create a new Symbol in Flash, I like to start with a rectangle that's the size I want the MovieClip to wind up, so the registration and transformation points fall in predictable places. So, I create a rectangle the size of my images and convert it to a Symbol (F8).
Step 4: Import the PSD
I usually use the keyboard shortcut to import to stage (Ctrl-R). The import dialogue gives me lots of options. For example, I can select all the images and choose to convert them to MovieClips.I'll usually convert the images to MovieClips if I want to do timeline animation with them or if I want to apply a base Class to the MovieClip. I can also choose to import each to a different layer or to a different keyframe. Both options are useful, depending on the end result I need.
Once the psd has imported, the timeline looks like this.
Note that the frames will be the reverse order of the order they were in in Bridge. I usually select the frames and reverse the frames (there's a right-click menu for it, but I've set up a keyboard shortcut).
Step 5: Edit the Library Symbols
The MovieClips and Images are nicely organized, but usually there is more I want to do to them.
If I'm applying a Base Class, I might want to rename all the Symbols, for instance, to change ".png" to "_png." I like the Search and Replace extension for this.
Flash also allows you to edit more than one library symbol at a time, by selecting several symbols and clicking the Properties button (sorry, if there is a shortcut for this, I haven't found it).
From this dialogue, you could change all the MovieClips to Graphics, for example, or you could set a Base Class on all the MovieClips at once. Tip: if you set a Base Class, Export for ActionsScript will become checked and the drop-down will have "Yes" selected, and you don't have to touch it.And that's it, my quick and easy workflow for importing a series of images to Flash.


1 comments:
Very helpful. The one drawback that I see is that, in my case, I have some pieces to assemble that have gradients, and these tend to make the edges kind of ragged. But otherwise a good way to save time.
Post a Comment