Extending JSDom's HTMLElement for Jest Testing

english mobile

Tape measure extended diagonally across a barren landscape

If you're unit testing your visual JavaScript/HTML components using jsdom for DOM rendering, sooner or later you will encounter the unimplemented parts of the library. If you're not sure if you're using jsdom, check your project's package.json for "jsdom" in "dependencies" or "devDependencies". Most projects set up to use jest also use jsdom if they're testing the rendering of html elements.

I'm going to focus on extending HTMLElement, but, as the jsdom docs state, you can use these principles to fill in any functionality you're missing. I first encountered this issue while trying to implement automatic scrolling to a specific element, so let's start there. Say, for example, that your component calls scrollIntoView() on itself or a child component.

As soon as you call the method in your component that includes scrollIntoView(), you will get an error in your tests (the specific error will depend on what JavaScript framework, if any, you're using). At the very least, you need to provide an implementation of scrollIntoView() to get rid of the error. And if that's all you need, look no further than this Stack Overflow answer. In a nutshell, you add a scrollIntoView property to HTMLElement and assign a jest mock function to that property.

But what if you need to know if scrollIntoView was called from a specific HTMLElement? If you just add one function to the prototype of all HTMLElements, there's no way to know which element called it. What we need is a way to check to see if specificElement.scrollIntoView.hasBeenCalled().

The first thing we need to understand is what are the elements of our solution? The first thing is we need to figure out how to take fine-grained control of the creation of HTMLElements, and we need to do it before we create those elements. The general outline is that we have to edit the incomplete implementation of HTMLElement in jsdom to allow us to create one jest mock per element instance.

Let's start with how we're going to get Jest to load the code that augments jsdom's implementation, because there's no point in writing the code if we can't get it pulled in. Jest has a configuration option, setupFilesAfterEnv, that's designed to allow you to specify one or more files to load after the environment has booted but before any tests have run. If that option already points to a file, you can just add your code there. Otherwise, you'll need to create that file and point to it.

The next thing we need to figure out is how to add to the implementation created by jsdom in a way that lets us specify one mock scrollToTop per instance. For that, we're going to turn to good old Obect.defineProperties(), which we'll use on window.HTMLElement.prototype. The trick, though, is to figure out how to create and store the instance of the mock on each element instance.

 For that, I use a pattern I think of as "get and/or create." Object.defineProperties() lets you specify a getter function. And the nice thing about functions is that they can do things other than just getting. While normally I would say that you don't want to write a getter that has a side effect, in this case we need to leverage that, because when we define our getter we know that it will run in the scope of the instance we're trying to add to. The other thing we need is a place to store that instance so that, again, it's unique to each instance. Which is why we're using defineProperties and not defineProperty.

So the finished code looks like this:

Object.defineProperties(window.HTMLElement.prototype,
    {
        _scrollIntoView: {
            value: undefined,
            writable: true,
            configurable: true
        },
        scrollIntoView: {
            configurable: true,
            enumerable: true,
            get() {
                if (!this._scrollIntoView) this.scrollIntoView = jest.fn().mockName('scrollIntoView');
                return this._scrollIntoView;
            }
        }
    }

I hope you've found this post helpful. If so, please leave me a comment. Happy coding!

What I Learned by Being My Own Test Engineer

english mobile

The company I work for shifted focus from producing features very quickly to getting our code quality very solid to allow us to add new features without regressions. This means that it's "all hands on deck" for putting necessary tests in place to catch as many regressions as possible before we switch back into building new features.

I previously thought that it might not be worthwhile to have UI developers dive into Cucumber, Gherkin, and Selenium in Java, but this experience has opened my eyes. I've learned some things I'd been wondering about how the QA side of things works, as well as somethings I didn't know I didn't know.

QA Has a Set of Steps Written Down That They Run Through to Test

When we started writing our integration tests, one of our test engineers created a set of test cases for us to code. I'd been aware that there was a separate system used by QA, but not exactly what was in it. I belatedly realized that QA had been writing these kind of steps down all along–in that system I didn't have access to. The UI team had asked before for a set of steps to run through before submitting to QA, without success. I think the QA team had no idea we didn't have access to the system or know how to use it, and they probably wondered why we weren't using their steps. Classic miscommunication.

I also noticed how clear and precise the steps in the test case were relative to the requirements we usually get. The Project Owners I've worked with are typically focused on what they want to enable the user to do and how it should look, but there are often gaps in between. I really see the value in having the kinds of steps in a Gherkin Specification and getting sign-off before you start coding. So far, we've been writing these after the fact, but maybe in the future we can bring that forward in the process.

Some Automation Problems Are Probably Quicker and Easier to Solve if the Person Automating is Also the Developer

I've long thought that CSS in JS was one of those trends that codes around a basic lack of understanding, but it's an absolute nightmare from an automation perspective. A developer on our team had chosen to use React-Select for a search box. By default, this library only attaches dynamically-generated class names and inline styles, which makes it impossible to reliably target things like, oh, all the currently-displayed options.

Probably a test engineer would have either tried to drill down to the desired element with XPath or would have asked me to add an ID to the container inside react-select (which as far as I know is impossible). The XPath solution might have worked, but would have been extremely brittle. I would have had to say no to the impossible request. And that probably would have been the end of it for being able to test that functionality.

But since I understood the context of what was needed from the front-end developer side and I was really determined from the test engineer side, I was able to figure out how to get react-select to apply something akin to semantic class names (albeit it still feels a bit hacky and fragile based on the fact you have to concatenate the classNamePrefix you provide together with another string you can find only by inspecting an instance of the component to get the other part of the class name to use).

I'm going to add an editorial comment here that there's just no polite way to say–CSS in JS is crap. But if you're going to use it and you're developing a library you want others to use, please also provide semantic class names that can be used on their own for developers who need to integrate your component into a look and feel provided by designers who don't really have detailed understanding about how you intended customization to work. They are pretty much guaranteed to specify something you didn't imagine, that's very difficult to provide without hooks to allow developers to target the innards of your component.

Also, basic things like being able to look at the source of a page and provide an anchor link to a specific spot (like I tried to do for "classNamePrefix," in the react-select docs to use in the above paragraph) become impossible. And, circling back, semantic class names will make your code much easier to automate as well. You don't have to attach any styling of your own to the sematic class names if that bothers you. But please provide the hooks, for everyone else's sake!

Unit Tests Won't Catch Everything

I formerly had the opinion that if you practiced Test-Driven-Development on the front end and your tests covered pretty much all new functionality, that integration problems would be really obvious when you ran the code. Then you could easily see them and fix them. But I found a number of subtle bugs when writing these test cases that my unit tests hadn't caught.

For example, every test case has a requirement to check the console log for errors. This caught a call that we were making to a third-party component that's not entirely built in React that happened before that component had loaded, which threw a null pointer exception. In this case, the only side-effect was a console error, but you don't want your code that's aimed at savvy developers throwing console errors. It doesn't inspire a warm fuzzy.

In another place, I found that logic that merges the results of two API calls in different formats to generate a series of other API calls was not merging those calls correctly with realistic data, rather than our limited test data that we use while developing. That's not something my unit tests are equipped to catch.

In Summary

I'm probably not going to "quit my day job" to become a full-time QA Engineer, but I feel like pulling back the curtain some has really helped me as a developer. Even aside from the fact that thinking about things in an OO, strongly-typed way for a change has given me a fresh perspective, understanding more about how the QA sauce is made has made me way more sympathetic to the issues our test engineers face. Hopefully, I'll be able to provide more QA-friendly code in the future.

AlaSQL to search your JSON

english mobile

When you're working in JavaScript, many times you'll have a data source that is one or more JSON or JSON-like objects. When those objects are stored in an Array, you can use filter() to find the element you need, but what happens when you start to get into nested Objects—where the JSON elements in your Array themselves contain Arrays or Objects? Then you wind up with filters within filters, null checking to avoid checking properties on objects that may or may not be there, etc. Wouldn't it be nice if you could just query the objects?

With AlaSQL, you can! Note that AlaSQL can do a lot more than just querying JSON, but I'm focusing on that because that's how I'm using it at the moment. The documentation on the syntax of how to do this is written from the perspective of someone who already understands the syntax, so it doesn't really cover all the use cases I ran into. Between trawling the tests and a great deal of trial and error, I've arrived at a "layman's" understanding of how some of this works, so I thought I'd share my thoughts to make it easier for more people to use this great tool.

Here's a plunker that you can launch in a separate window to follow along:

SEARCH "/"

The forward slash just represents a "level" in the JSON Object/Array. It's especially useful when dealing with a level that's an Array, because that level won't have named properties (see example 1).

The forward slash both says where to search and what to return. So it navigates to a specific depth for both purposes (see example 2). In this example, the first "/" is the root of the Array. The second is the properties of the Objects returned, and the third says "look inside those properties." So it's the same as example 3, because categories is the only property with anything nested in it. In example 3, you can think of "categories" as being a more specific version of "/".

Returning values at a different level than where you're searching

There are two instances in which you need to return elements at a different level than you're searching: one where you need to find some ancestor element where child objects satisfy the query and one where you need to go further and get properties from the objects satisfying the query.

I'm going to start with the second first, because it's simpler. All you have to do is add the property you're looking for between the end of your entire SEARCH statement and the beginning of the FROM (esample 4). Usually that means it's going to go after WHERE (and ORDER BY, which we'll get to later), which is a little odd if you're used to database SQL, but it makes sense if you think of the result of the SEARCH as an object and then you're saying "and then I want this from the returned object."

In the case of finding an ancestor, you can kind of think of it as using a variable to say "hold that thought" at a specific level of navigation as you're drilling down, by storing that level in a variable. Then, just as you do with a property, you ask AlaSQL to return that variable from the search result (example 5).

DISTINCT, ORDER BY

DISTINCT with SEARCH is similar to DISTINCT with SELECT in regular SQL in that it wants to be right after SEARCH. It uses parentheses to enclose what should be distinct, and those should go around the entire statement that says what the SEARCH criteria are (example 6).

Like variables referring to ancestors, ORDER BY goes before FROM. It also has a special syntax for ordering by "whatever it was that the search selected." This is handy, because it can get kind of fiddly trying to figure out what the path to that should be in the ORDER BY clause. To use this syntax, just put ASC or DESC in parentheses after ORDER BY (example 7). Note that you can also just leave the parentheses empty, which is the same as ASC.

Other use cases

I'm sure I've only scratched the surface ot the SEARCH syntax, but these were a few that I ran into in my own project. I've created a plunker so that I can explore different use cases without having to wait for my Angular 2 TypeScript project to compile every time I make a change. Feel free to use it as well!

Karma Like a Boss

english mobile

For a long time, I thought you couldn't set a break point in a Jasmine test running in Karma. Heck, I even said that in a blog post. I recently learned this wasn't true. Once you know how debugging in Karma works, it seems really obvious, but I think I'm probably not alone in missing this entire feature or understanding how to make best use of it.

So let's start out by looking at a browser running Karma. When I first launched Karma with my first expect(true).toBe(true) test, I saw pretty much what everyone sees:

Of course, I clicked that honking obvious Debug button, and I got this:

Oh, thank you so much. What am I supposed to do with that? So I assumed like every end user since ever that the developer had screwed up and of course I wasn't missing something.

Meanwhile, I had the problem that all those console.log statements I kept dumping into Karma got really hard to read if it was set up to constantly rerun every time I changed a file because when I'd scroll up it was very difficult to find the beginning of any particular run. So I set Karma up to just run once and then exit so I could enter "cls" (clear screen) between runs. So the browser window closed after each run and for sure there were no break points being set.

Fast forward to the past couple of months and I've been working in Angular 2. Angular 2 and TypeScript are, in my opinion, a hot mess in terms of being able to figure out what's going on, so I've been researching hot and heavy into getting more insight when creating and running tests. So far none of that research is actually helping me with Angular 2, but when I recently worked on a coding challenge for a major software company--I am available for hire by the way--in AngularJS, all this research was pretty useful.

So let's unpick a few things that are really helpful to know:

  1. There is a reporter, karma clear screen reporter, that will clear the console at the beginning of each test run, which means you can let karma run continuously. Once you are at that point, you now have your Debug button back.
  2. When you open the Debug window, you're expected to use the browser's debug tools by pressing F12 or opening the developer tools however your favorite browser wants you to do that. At that point, you can set your break points and refresh the debug window to get access to all that debugging goodness.
  3. If you let Webstorm set up your Angular project for you, it does kind of a junit thing that by default runs karma only once every time you click the "run" button (don't use the debug button or you can't see the tree of your unit tests), but it leaves the karma browser window open. This leaves a nice clean terminal display, still gives you access to the Debug button, and shows you colorful little icons that indicate the status of your tests.

My mother like to say "the obvious, isn't." This was a lesson for me in how true this is. I hope this helps someone not go quite so long making the mistakes I did.

Multiple SVGs and CSS in AngularJS (or why SVG has to be inlined)

english mobile

In my previous post, I discussed the steps to create a SVG for use in an AngularJS project, ending with a very simple interactive SVG in Angular. In that fiddle, the SVG was completely inlined. In the case where there is only one inline SVG, it really doesn't matter if all the CSS is internal or external unless you plan to switch style sheets at runtime.

However, once you have more than one SVG, it becomes more efficient to use one style sheet for all of them. Not only that, when you use inline SVG, the SVG XML is part of the HTML DOM, so CSS styles can collide if they have the same name. As in normal CSS, the internal CSS in the SVG that is loaded latest will win in the case of a conflict. Using an external style sheet consolidates all your styles in one place so it's obvious that you're trying to call different visual styles the same thing.

Given that the CSS styles can overwrite each other (not to mention that Angular 2 is dropping support for ng-include), you might want to use one of the other methods of adding SVG to HTML, an img or object tag, so that we can take advantage of the shadow DOM. Unfortunately, AngularJS also can't reach inside the shadow DOM. This is something I realized when I started building my own example where I was going to explore techniques for styling SVG inside the shadow DOM. But since the SVG can't be made interactive with AngularJS, it kind of spoils things. Sorry for the ugly example—I'd already pulled out the CSS before I realized the SVG wasn't going to be interactive.

It's going to be interesting seeing how this plays out with Angular 2's removal of ng-include. I wonder if people will have to go to reading in the SVG XML via HTTP and hand-compiling it to get interactivity, or if Angular 2 has taken out that capability as well.

Preparing SVG for use in AngularJS

english mobile

Most developers are not also designers, but we commonly have to take a static design we get and figure out how to make it interactive. Recently, I received a set of Illustrator files that depicted circuit diagrams that a user needed to interact with to say whether they thought the circuit would have enough power to light one or more light bulbs.

I could have tried to simply create graphics with every possible state of all the bulbs, but I decided that would be difficult to maintain. I could also have tried to overlay each bulb with a div that contained the various states for that bulb, but I thought that would be difficult to make responsive. Instead, I decided to use data binding in AngularJS to allow users to interact directly with the bulbs inside the SVG.

What I found is there are a lot of resources on SVG in various places on the internet, but none pulled together all the pieces needed to accomplish this task. So I figure it’s up to me. Here are the things I needed to find out to make this work:

In this post, we'll get up and running with a simple SVG example. In the next post, we'll look at the different ways you can use SVG in HTML and the plusses and minuses of each.

How to get Illustrator to create a usable SVG file

Let’s imagine that the illustrator file I got from the designer looks something like this:
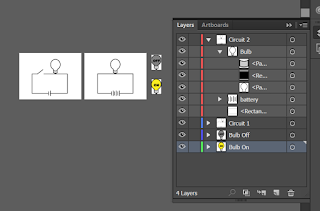
Illustrator File Structure

Because I know where I’m headed with this, the file is clean, tidy, and organized. More than likely you will have to clean up paths so they don’t have a lot of unnecessary points that will bloat your file size. You may also need to create groups and layers.

Tips: When you export files from Illustrator, each art board will be a different file. The groups and layers control how the objects are organized within that. It is possible to have objects that are in different layers that are on the same art board, and vice versa, so you may need to reorganize the files to fix that.

Avoid using underscores in layer and group names, because AI will encode them in an odd way. If you want an underscore in an object ID, use a space and Illustrator will replace it with an underscore.

At this point, you might be tempted to follow the Illustrator docs and go to File>Export>SVG. You can try, but the sad truth is there is no SVG option under File>Export in Illustrator CC. Instead, you can go to File>Save As. You’ll want to select “Use ArtBoards.”
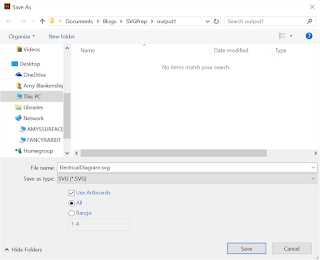
Save As dialog

Once you click “Save”, it doesn’t save—Hey-ho, counterintuitive dialog! Instead, it will take you to another dialog, where you can select your SVG output options. The defaults are pretty good. Note here that we’ve selected “Style Attributes” for our CSS Properties. What that means is that things like stroke and fill color will be turned into CSS styles in a style tag at the top of the document. For more on the other options, see Demystifying Adobe Illustrator's Advanced Options for SVG Work.
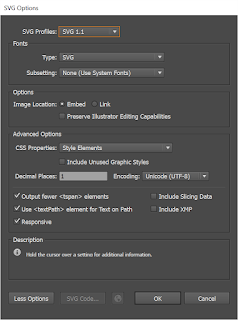
SVG Save Options

Once you click “OK,” you’ll get an SVG file for every artboard. If you open one of these in any XML or text editor, you’ll get something (output1) like this:

<?xml version="1.0" encoding="utf-8"?>
<!-- Generator: Adobe Illustrator 18.1.0, SVG Export Plug-In . SVG Version: 6.00 Build 0) -->
<svg version="1.1" xmlns="http://www.w3.org/2000/svg" xmlns:xlink="http://www.w3.org/1999/xlink" x="0px" y="0px"
viewBox="0 0 400 300" style="enable-background:new 0 0 400 300;" xml:space="preserve">
<style type="text/css">
.st0{fill:#FCEE21;stroke:#000000;stroke-width:3;stroke-miterlimit:10;}
.st1{stroke:#000000;stroke-width:3;stroke-miterlimit:10;}
.st2{fill:#CCCCCC;stroke:#000000;stroke-width:2;stroke-miterlimit:10;}
.st3{fill:#808080;stroke:#000000;stroke-width:3;stroke-miterlimit:10;}
.st4{fill:#FFFFFF;stroke:#000000;stroke-width:3;stroke-miterlimit:10;}
.st5{fill:#FFFFFF;}
.st6{fill:none;stroke:#000000;stroke-width:3;stroke-miterlimit:10;}
</style>
<g id="Bulb_On">
</g>
<g id="Bulb_Off">
</g>
<g id="Circuit_1">
<polyline class="st4" points="158.3,137.1 311.3,137.1 311.3,261.2 83.3,261.2 83.3,137.1 117.4,137.1 154.4,108.1 "/>
<g id="battery">
<rect x="188.5" y="258" class="st5" width="15.1" height="6"/>
<line class="st6" x1="190.5" y1="250" x2="190.5" y2="274"/>
<line class="st6" x1="201.5" y1="244" x2="201.5" y2="278"/>
</g>
<g id="Bulb_1_">
<path class="st4" d="M264.9,76.3c0-18.6-13.9-33.6-31-33.6c-17.1,0-30.8,15.1-30.8,33.6c0,13.7,7.5,25.4,18.5,30.7v21.6h25v-21.6
C257.5,101.7,264.9,89.9,264.9,76.3z"/>
<rect x="230.5" y="131.3" class="st1" width="6.8" height="5.6"/>
<path class="st2" d="M246.6,129.6c-2.6,1-6.6,2.3-11.7,2.4c-6.1,0.2-10.9-1.3-13.7-2.4c0-5.9,0-11.8,0-17.7
c2.1,1.1,6.6,3.3,12.8,3.3c6.1,0,10.5-2.1,12.6-3.3C246.6,117.8,246.6,123.7,246.6,129.6z"/>
</g>
</g>
<g id="Circuit_2">
</g>
</svg>

I don't know about you, but I'd like some more informative style names. So, back in the Illustrator file, we'll create and apply some named styles, like so:
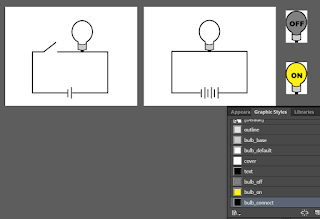
Illustrator file with named styles applied

Once you do that, your SVG should look more like this:

  • <?xml version="1.0" encoding="utf-8"?>
    <!-- Generator: Adobe Illustrator 18.1.0, SVG Export Plug-In . SVG Version: 6.00 Build 0) -->
    <svg version="1.1" xmlns="http://www.w3.org/2000/svg" xmlns:xlink="http://www.w3.org/1999/xlink" x="0px" y="0px"
    viewBox="0 0 400 300" style="enable-background:new 0 0 400 300;" xml:space="preserve">
    <style type="text/css">
    .outline{fill:none;stroke:#000000;stroke-width:3;stroke-miterlimit:10;}
    .bulb_base{fill:#CCCCCC;stroke:#000000;stroke-width:2;stroke-miterlimit:10;}
    .bulb_default{fill:#FFFFFF;stroke:#000000;stroke-width:3;stroke-miterlimit:10;}
    .cover{fill:#FFFFFF;}
    .bulb_connect{stroke:#000000;stroke-width:3;stroke-miterlimit:10;}
    .st0{fill:#FCEE21;stroke:#000000;stroke-width:3;stroke-miterlimit:10;}
    .st1{fill:#808080;stroke:#000000;stroke-width:3;stroke-miterlimit:10;}
    </style>
    <g id="Bulb_On">
    </g>
    <g id="Bulb_Off">
    </g>
    <g id="Circuit_1">
    <polyline class="outline" points="158.3,137.1 311.3,137.1 311.3,261.2 83.3,261.2 83.3,137.1 117.4,137.1 154.4,108.1 "/>
    <g id="battery">
    <rect x="188.5" y="258" class="cover" width="15.1" height="6"/>
    <line class="outline" x1="190.5" y1="250" x2="190.5" y2="274"/>
    <line class="outline" x1="201.5" y1="244" x2="201.5" y2="278"/>
    </g>
    <g id="Bulb_1_">
    <path class="bulb_default" d="M264.9,76.3c0-18.6-13.9-33.6-31-33.6c-17.1,0-30.8,15.1-30.8,33.6c0,13.7,7.5,25.4,18.5,30.7v21.6
    h25v-21.6C257.5,101.7,264.9,89.9,264.9,76.3z"/>
    <rect x="230.5" y="131.3" class="bulb_connect" width="6.8" height="5.6"/>
    <path class="bulb_base" d="M246.6,129.6c-2.6,1-6.6,2.3-11.7,2.4c-6.1,0.2-10.9-1.3-13.7-2.4c0-5.9,0-11.8,0-17.7
    c2.1,1.1,6.6,3.3,12.8,3.3c6.1,0,10.5-2.1,12.6-3.3C246.6,117.8,246.6,123.7,246.6,129.6z"/>
    </g>
    </g>
    <g id="Circuit_2">
    </g>
    </svg>

Hand-editing the files

This file is in much better shape. It has some extra things you'll need to remove, but all of that is obvious. First, you need to remove the comment. After that, you can remove the styles that are in the form .stx (where x is some number). Those are the styles that are not used by the graphics that were on the artboard that became this particular document. Then you need to remove the empty "g" tags that, again, represent the other art boards.

We're only going to use the two circuit diagrams in Angular, but we need to combine the two bulbs into one "g" tag and replace the existing bulb in each circuit diagram with it. One of the goals is to have a "g" where all the graphics are relative to the zero point so we can just translate it to where the empty bulb is in the circuit diagram. This is because the syntax of the path objects doesn't lend itself to easily being moved around in the SVG file, so it's easier to create the objects at the zero point and move the entire group they are in. Unfortunately, we can't just use the bulbs output as SVG because they didn't respect the artboard bounds used in the document. So we're going to go back to Illustrator and create a new file with all the needed shapes by copying and pasting pieces from our existing file.
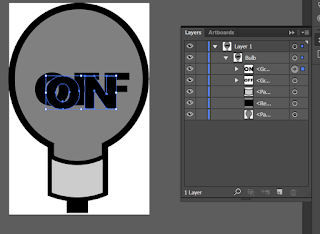
Bulb with both on and off text in Illustrator

If you simply copy all the contents of this document to your clipboard, your clipboard will contain something like this:

<!-- Generator: Adobe Illustrator 18.1.0, SVG Export Plug-In  -->
<svg version="1.1"
xmlns="http://www.w3.org/2000/svg" xmlns:xlink="http://www.w3.org/1999/xlink" xmlns:a="http://ns.adobe.com/AdobeSVGViewerExtensions/3.0/"
x="0px" y="0px" width="65px" height="97.2px" viewBox="0 0 65 97.2" style="overflow:scroll;enable-background:new 0 0 65 97.2;"
xml:space="preserve">
<style type="text/css">
.bulb_base{fill:#CCCCCC;stroke:#000000;stroke-width:2;stroke-miterlimit:10;}
.bulb_connect{stroke:#000000;stroke-width:3;stroke-miterlimit:10;}
.bulb_off{fill:#808080;stroke:#000000;stroke-width:3;stroke-miterlimit:10;}
</style>
<defs>
</defs>
<g id="Bulb_1_">
<path class="bulb_off" d="M63.5,35.1c0-18.6-13.6-33.6-30.8-33.6C15.6,1.5,1.5,16.6,1.5,35.1c0,13.7,7.1,25.4,18.1,30.7v21.6h25
V65.8C55.6,60.5,63.5,48.8,63.5,35.1z"/>
<rect x="28.4" y="90.1" class="bulb_connect" width="6.8" height="5.6"/>
<path class="bulb_base" d="M44.6,88.4c-2.6,1-6.6,2.3-11.7,2.4c-6.1,0.2-10.9-1.3-13.7-2.4c0-5.9,0-11.8,0-17.7
C21.2,71.9,25.8,74,32,74c6.1,0,10.5-2.1,12.6-3.3C44.6,76.6,44.6,82.5,44.6,88.4z"/>
<g id="Off_text_1_">
<path class="text" d="M12.3,39.9c0-9.9,15.1-10.5,15.6-0.6c0.2,4.9-2.7,8.3-7.6,8.3C15.5,47.6,12.3,44.6,12.3,39.9z M17,39.9
c0,2.1,0.7,4.2,3.1,4.3c2.6,0,3.2-2.4,3.1-4.5C23.2,34.4,17,34.6,17,39.9z"/>
<path class="text" d="M30.4,32.3h11.5v3.2h-6.8v2.6h5.8v3h-5.8v6.1h-4.7V32.3z"/>
<path class="text" d="M44.4,32.3h11.5v3.2h-6.8v2.6h5.8v3h-5.8v6.1h-4.7V32.3z"/>
</g>
<g id="On_text_1_">
<path class="text" d="M17.3,41.4c0-9.9,15.1-10.5,15.6-0.6c0.2,4.9-2.7,8.3-7.6,8.3C20.5,49.2,17.3,46.2,17.3,41.4z M22,41.5
c0,2.1,0.7,4.2,3.1,4.3c2.6,0,3.2-2.4,3.1-4.5C28.2,36,22,36.2,22,41.5z"/>
<path class="text" d="M35.4,33.9h4.3l5.7,8.3v-8.3h4.4v15h-4.4l-5.6-8.3V49h-4.4V33.9z"/>
</g>
</g>
</svg>

Note that if you copy a selection that contains actual text, you will not get SVG on your clipboard. Instead, you'll just get the text.

The part we want is the "g" with the id of "Bulb_1." I'm going to clean up and rename some things to remove the unnecessary numbers Illustrator is putting at the end of many of our g id's. I'll also change the path that has a class of "bulb_off" to have no class, but instead to have an id of "bulb_bg." We'll be changing the fill of this path and the visibility of the "off" and "on" text based on whether the bulb is on or off. We'll wind up with this:

<g id="Bulb">
<path id="bulb_bg" d="M63.5,35.1c0-18.6-13.6-33.6-30.8-33.6C15.6,1.5,1.5,16.6,1.5,35.1c0,13.7,7.1,25.4,18.1,30.7v21.6h25
V65.8C55.6,60.5,63.5,48.8,63.5,35.1z"/>
<rect x="28.4" y="90.1" class="bulb_connect" width="6.8" height="5.6"/>
<path class="bulb_base" d="M44.6,88.4c-2.6,1-6.6,2.3-11.7,2.4c-6.1,0.2-10.9-1.3-13.7-2.4c0-5.9,0-11.8,0-17.7
C21.2,71.9,25.8,74,32,74c6.1,0,10.5-2.1,12.6-3.3C44.6,76.6,44.6,82.5,44.6,88.4z"/>
<g id="Off_text">
<path class="text" d="M12.3,39.9c0-9.9,15.1-10.5,15.6-0.6c0.2,4.9-2.7,8.3-7.6,8.3C15.5,47.6,12.3,44.6,12.3,39.9z M17,39.9
c0,2.1,0.7,4.2,3.1,4.3c2.6,0,3.2-2.4,3.1-4.5C23.2,34.4,17,34.6,17,39.9z"/>
<path class="text" d="M30.4,32.3h11.5v3.2h-6.8v2.6h5.8v3h-5.8v6.1h-4.7V32.3z"/>
<path class="text" d="M44.4,32.3h11.5v3.2h-6.8v2.6h5.8v3h-5.8v6.1h-4.7V32.3z"/>
</g>
<g id="On_text>
<path class="text" d="M17.3,41.4c0-9.9,15.1-10.5,15.6-0.6c0.2,4.9-2.7,8.3-7.6,8.3C20.5,49.2,17.3,46.2,17.3,41.4z M22,41.5
c0,2.1,0.7,4.2,3.1,4.3c2.6,0,3.2-2.4,3.1-4.5C28.2,36,22,36.2,22,41.5z"/>
<path class="text" d="M35.4,33.9h4.3l5.7,8.3v-8.3h4.4v15h-4.4l-5.6-8.3V49h-4.4V33.9z"/>
</g>
</g>

Next, we'll go back into one of our circuit svg files and replace the plain bulb with this bulb, translated to where the original bulb was. I usually look in illustrator at the properties or transform panel in the original file to see where it was.

The edited svg looks like this:

<?xml version="1.0" encoding="utf-8"?>
<svg version="1.1" xmlns="http://www.w3.org/2000/svg" xmlns:xlink="http://www.w3.org/1999/xlink" x="0px" y="0px"
viewBox="0 0 400 300" style="enable-background:new 0 0 400 300;" xml:space="preserve">
<style type="text/css">
.outline{fill:none;stroke:#000000;stroke-width:3;stroke-miterlimit:10;}
.bulb_base{fill:#CCCCCC;stroke:#000000;stroke-width:2;stroke-miterlimit:10;}
.bulb_default{fill:#FFFFFF;stroke:#000000;stroke-width:3;stroke-miterlimit:10;}
.cover{fill:#FFFFFF;}
.bulb_connect{stroke:#000000;stroke-width:3;stroke-miterlimit:10;}
</style>
<g id="Circuit_1">
<polyline class="outline" points="158.3,137.1 311.3,137.1 311.3,261.2 83.3,261.2 83.3,137.1 117.4,137.1 154.4,108.1 "/>
<g id="battery">
<rect x="188.5" y="258" class="cover" width="15.1" height="6"/>
<line class="outline" x1="190.5" y1="250" x2="190.5" y2="274"/>
<line class="outline" x1="201.5" y1="244" x2="201.5" y2="278"/>
</g>
<g id="Bulb" transform="translate(201, 41)">
<path id="bulb_bg" d="M63.5,35.1c0-18.6-13.6-33.6-30.8-33.6C15.6,1.5,1.5,16.6,1.5,35.1c0,13.7,7.1,25.4,18.1,30.7v21.6h25
V65.8C55.6,60.5,63.5,48.8,63.5,35.1z"/>
<rect x="28.4" y="90.1" class="bulb_connect" width="6.8" height="5.6"/>
<path class="bulb_base" d="M44.6,88.4c-2.6,1-6.6,2.3-11.7,2.4c-6.1,0.2-10.9-1.3-13.7-2.4c0-5.9,0-11.8,0-17.7
C21.2,71.9,25.8,74,32,74c6.1,0,10.5-2.1,12.6-3.3C44.6,76.6,44.6,82.5,44.6,88.4z"/>
<g id="Off_text">
<path class="text" d="M12.3,39.9c0-9.9,15.1-10.5,15.6-0.6c0.2,4.9-2.7,8.3-7.6,8.3C15.5,47.6,12.3,44.6,12.3,39.9z M17,39.9
c0,2.1,0.7,4.2,3.1,4.3c2.6,0,3.2-2.4,3.1-4.5C23.2,34.4,17,34.6,17,39.9z"/>
<path class="text" d="M30.4,32.3h11.5v3.2h-6.8v2.6h5.8v3h-5.8v6.1h-4.7V32.3z"/>
<path class="text" d="M44.4,32.3h11.5v3.2h-6.8v2.6h5.8v3h-5.8v6.1h-4.7V32.3z"/>
</g>
<g id="On_text>
<path class="text" d="M17.3,41.4c0-9.9,15.1-10.5,15.6-0.6c0.2,4.9-2.7,8.3-7.6,8.3C20.5,49.2,17.3,46.2,17.3,41.4z M22,41.5
c0,2.1,0.7,4.2,3.1,4.3c2.6,0,3.2-2.4,3.1-4.5C28.2,36,22,36.2,22,41.5z"/>
<path class="text" d="M35.4,33.9h4.3l5.7,8.3v-8.3h4.4v15h-4.4l-5.6-8.3V49h-4.4V33.9z"/>
</g>
</g>
</g>
</svg>

If you preview the SVG in a browser, it looks like this, because we haven't defined the on and off classes or applied them:
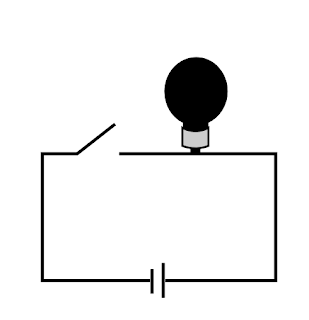
Circuit diagram with black bulb

We'll add the styles for the bulb based on the named styles in our exported svg with the on and off bulbs in them. I usually hard-code the class for each state just to make sure they look the way I expect. This is the code for the "on" state:

<?xml version="1.0" encoding="utf-8"?>
<svg version="1.1" xmlns="http://www.w3.org/2000/svg" xmlns:xlink="http://www.w3.org/1999/xlink" x="0px" y="0px"
viewBox="0 0 400 300" style="enable-background:new 0 0 400 300;" xml:space="preserve">
<style type="text/css">
.outline{fill:none;stroke:#000000;stroke-width:3;stroke-miterlimit:10;}
.bulb_base{fill:#CCCCCC;stroke:#000000;stroke-width:2;stroke-miterlimit:10;}
#bulb_bg{fill:#FFFFFF;stroke:#000000;stroke-width:3;stroke-miterlimit:10;}
#On_text, #Off_text {visibility:hidden}
.cover{fill:#FFFFFF;}
.bulb_connect{stroke:#000000;stroke-width:3;stroke-miterlimit:10;}
.off #bulb_bg {fill:#808080;stroke:#000000;stroke-width:3;stroke-miterlimit:10;}
.on #On_text, .off #Off_text {visibility:visible}
.on #bulb_bg {fill:#FCEE21;stroke:#000000;stroke-width:3;stroke-miterlimit:10;}
</style>
<g id="Circuit_1">
<polyline class="outline" points="158.3,137.1 311.3,137.1 311.3,261.2 83.3,261.2 83.3,137.1 117.4,137.1 154.4,108.1 "/>
<g id="battery">
<rect x="188.5" y="258" class="cover" width="15.1" height="6"/>
<line class="outline" x1="190.5" y1="250" x2="190.5" y2="274"/>
<line class="outline" x1="201.5" y1="244" x2="201.5" y2="278"/>
</g>
<g id="Bulb" class="on" transform="translate(201, 41)">
<path id="bulb_bg" d="M63.5,35.1c0-18.6-13.6-33.6-30.8-33.6C15.6,1.5,1.5,16.6,1.5,35.1c0,13.7,7.1,25.4,18.1,30.7v21.6h25
V65.8C55.6,60.5,63.5,48.8,63.5,35.1z" />
<rect x="28.4" y="90.1" class="bulb_connect" width="6.8" height="5.6"/>
<path class="bulb_base" d="M44.6,88.4c-2.6,1-6.6,2.3-11.7,2.4c-6.1,0.2-10.9-1.3-13.7-2.4c0-5.9,0-11.8,0-17.7
C21.2,71.9,25.8,74,32,74c6.1,0,10.5-2.1,12.6-3.3C44.6,76.6,44.6,82.5,44.6,88.4z"/>
<g id="Off_text">
<path class="text" d="M12.3,39.9c0-9.9,15.1-10.5,15.6-0.6c0.2,4.9-2.7,8.3-7.6,8.3C15.5,47.6,12.3,44.6,12.3,39.9z M17,39.9
c0,2.1,0.7,4.2,3.1,4.3c2.6,0,3.2-2.4,3.1-4.5C23.2,34.4,17,34.6,17,39.9z"/>
<path class="text" d="M30.4,32.3h11.5v3.2h-6.8v2.6h5.8v3h-5.8v6.1h-4.7V32.3z"/>
<path class="text" d="M44.4,32.3h11.5v3.2h-6.8v2.6h5.8v3h-5.8v6.1h-4.7V32.3z"/>
</g>
<g id="On_text">
<path class="text" d="M17.3,41.4c0-9.9,15.1-10.5,15.6-0.6c0.2,4.9-2.7,8.3-7.6,8.3C20.5,49.2,17.3,46.2,17.3,41.4z M22,41.5
c0,2.1,0.7,4.2,3.1,4.3c2.6,0,3.2-2.4,3.1-4.5C28.2,36,22,36.2,22,41.5z"/>
<path class="text" d="M35.4,33.9h4.3l5.7,8.3v-8.3h4.4v15h-4.4l-5.6-8.3V49h-4.4V33.9z"/>
</g>
</g>
</g>
</svg>

It looks like this in the browser:
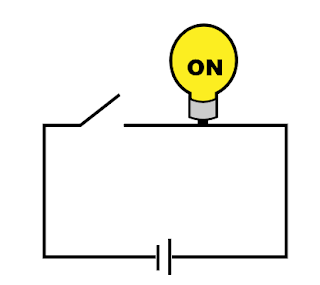
Circuit with bulb on

Now that we know all our styles look right, we're going to edit the Bulb group to be interactive:

<g id="Bulb" data-ng-class="bulb.state" data-ng-click="toggleBulbState()" transform="translate(201, 41)">
...
</g>

A Simple AngularJS Project with Interactive SVG

Spying on AngularJS Services That Are called Directly as Functions

english mobile

Jasmine spies are great. But when testing AngularJS services, it can really be be hard to test that the correct calls are being made to services where you’re calling the service itself instead of an attached method, such as the $interval service. When you’re testing controllers, you can directly inject your own spy if you want to test that $interval was called with the correct arguments, but how do you get hold of a function that’s not attached to an object to be able to spy on it?
It turns out that your only option is to replace the service with your spy in the config phase with either $provide.decorator, or module.decorator. For your TL;DR convenience, here is a working module that you can add to the list of modules you instantiate before each test. I’ll explain why all this works after the code.

angular.module('spies.interval', [])
    .decorator('$interval', function($delegate){
       var spy = jasmine.createSpy(‘$interval’).and.callFake(
           function()  {
               return  $delegate.apply(arguments);
           }
       )
       spy.cancel =  angular.bind($delegate, $delegate.cancel);
       spy.flush =  angular.bind($delegate, $delegate.flush);
       spyOn(spy,  'cancel').and.callThrough();
       return spy;
    })

The spy game

Let’s first think about what happens when you call spyOn(someObj, ‘someFunction’), so we can understand why we’re not using that syntax here. Jasmine looks at someObj. If someObj has a function called ‘someFunction’, jasmine overwrites that function with a generic spy which may or may not call the original someFunction. But without someObj, there is nothing to attach that replacement function to to make the replacement invisible to the calling code under test.

Knowing when to delegate

So we have to “trick” Angular into injecting our replacement into the code under test when the code asks for the $interval service. We do this by returning the actual spy rather than an altered $delegate.
This then becomes very different from injecting a fake $interval service into a controller that’s created for just one test, because when you call $interval(), it caches the method to call after the elapsed time, the elapsed time, and so forth internally so that it can work its magic. So if you only replace $interval with a spy, you can no longer test that the right things happen after the time has elapsed, because that internal state isn’t right.
So we need to go on to call the actual $interval service, and we need to call it with the arguments that our service under test is using, which is why we use apply(). Once we’ve done that, we need to make sure to return the result of the call, a promise, so that when we test that code that should be canceled in our client code does not run, that doesn’t break because there’s no promise to give cancel().
Once you’ve taken all of the above into account, you have
var spy = jasmine.createSpy(‘$interval’).and.callFake(
    function() {
        return $delegate.apply(arguments);
})

Spies upon spies

 But you can’t call cancel yet (or flush), because the spy you’re replacing $interval with doesn’t have a cancel() method or a flush() method. If you try just directly adding the functions (spy.cancel = $delegate.cancel), the functions don’t run in the same scope that we wrote to when we called $delegate.apply().  By using angular.bind, we force them into the same scope as the delegate like so:
spy.cancel = angular.bind($delegate, $delegate.cancel);
spy.flush = angular.bind($delegate, $delegate.flush);
Finally, we spy on the cancel function. This is just a convenience—you can of course spy on this function as normal from any test.
spyOn(spy, 'cancel').and.callThrough();
And that, folks, is how you create a spy to be able to check that an angular service where the function is called directly was called with the correct methods without breaking the service.

But wait, there’s more

If you’re a Jasmine expert, you’re probably thinking that I could have just used the undocumented second argument of createSpy, which simplifies the code to this:
angular.module('spies.interval', [])
     .decorator('$interval', function($delegate){
        var spy =  jasmine.createSpy('$interval', $delegate);
        spyOn(spy,  'cancel').and.callThrough();
        return spy;    
})
Unfortunately, that doesn’t work. You would expect the Strategy to do the same thing internally that my home-rolled version does, but it doesn’t. Maybe some other day I’ll dig through the code and blog about why.

How useful is this anyway?

I think the main reason to use this is when the amount of time you need to wait or the optional arguments at the end will vary based on some data. However, your test usually can’t even see the method that ultimately gets called by $interval. So it feels a bit like it should not need to know so much about it that it is looking at what arguments are being passed to this function it can’t see.
So after all this, I ultimately came to feel that though you can do this, you probably shouldn’t, because it introduces a lot of coupling between your test and the internals of the methods in your service that you’re trying to test. For example, your test should not need to know whether your service internally creates its own closure to store state to call the method from in $interval or whether it directly stores that state in the end parameters of $interval.
In Scotland, they have a saying that a gentleman is a man who knows how to play the bagpipes, but doesn’t. I often feel that programming is like that.